 Docs
DocsPrestaShop
Integrate Cost+ with your PrestaShop store (9.x, 8.x, 1.7, and 1.6)

Integrate Cost+ as a payment method in your PrestaShop store. The Cost+ module is available for PrestaShop 9.x, PrestaShop 8.x, PrestaShop 1.7, and PrestaShop 1.6.1.x.
Prerequisites
- Active Cost+ merchant account
- PrestaShop 9.1 or later
- PHP 8.1 or later
- SSL/HTTPS enabled
- Admin access to your PrestaShop back office
- Active Cost+ merchant account
- PrestaShop 8.x installation
- PHP 8.0 or later
- Admin access to your PrestaShop back office
- MySQL 5.4 or higher
- Active Cost+ merchant account
- PrestaShop 1.7.x installation
- PHP 5.4 or later
- Admin access to your PrestaShop back office
- MySQL 5.4 or higher
- Active Cost+ merchant account
- PrestaShop 1.6.1.x installation
- PHP 5.6 or later (with cURL and OpenSSL extensions)
- SSL/HTTPS enabled on the storefront
- Admin access to your PrestaShop back office
1. Install the Module
Download the module from GitHub.
Method A: Upload Through Admin Panel (Recommended)
- Go to Modules → Module Manager in your admin panel
- Click Upload a module
- Drag and drop the ZIP file or select it manually
- Wait for the installation to finish
- Search for "NoPayn" and click Configure
Method B: Manual Upload
- Copy the
nopaynpayment/folder into your PrestaShopmodules/directory - Go to Modules → Module Manager
- Search for "NoPayn" and click Install
- Click Configure to open the settings
Download the module from GitHub.
Method A: Upload Through Admin Panel (Recommended)
- Go to Improve > Module Manager in your admin panel
- Click Upload a module
- Drag and drop the ZIP file or select it manually
- Wait for the installation to finish
- Scroll down to the "Other" section and click Configure under Cost+


Method B: Manual Upload via (S)FTP
- Extract the downloaded ZIP file
- Using an SFTP client (e.g. FileZilla, WinSCP), upload all folders to the
/modules/directory in your PrestaShop installation - Go to Improve > Modules > Module Catalog
- Search for "Cost+" -- check the Uninstalled Modules tab if needed
- Click Install
Download the module from GitHub.
Method A: Upload Through Admin Panel (Recommended)
- Go to Improve > Module Manager in your admin panel
- Click Upload a module
- Drag and drop the ZIP file or select it manually
- Wait for the installation to finish
- Scroll down to the "Other" section and click Configure under Cost+


Method B: Manual Upload via (S)FTP
- Extract the downloaded ZIP file
- Using an SFTP client (e.g. FileZilla, WinSCP), upload all folders to the
/modules/directory in your PrestaShop installation - Go to Modules > Module Manager
- Search for "Cost+" -- check the Uninstalled Modules tab if needed
- Click Install
Download the module from GitHub.
Method A: Upload Through Admin Panel (Recommended)
- Download
costpluspayment.zipfrom the GitHub Releases page - Go to Modules and Services in your PrestaShop back office
- Click Add a new module
- Upload the ZIP file
- Locate Cost+ Payment Gateway in the module list and click Install
Method B: Manual Upload via (S)FTP
- Extract the downloaded ZIP file
- Using an SFTP client, upload the
costpluspayment/folder to/modules/costpluspayment/in your PrestaShop installation - Go to Modules and Services in the back office
- Locate Cost+ Payment Gateway and click Install
2. Enter API Credentials
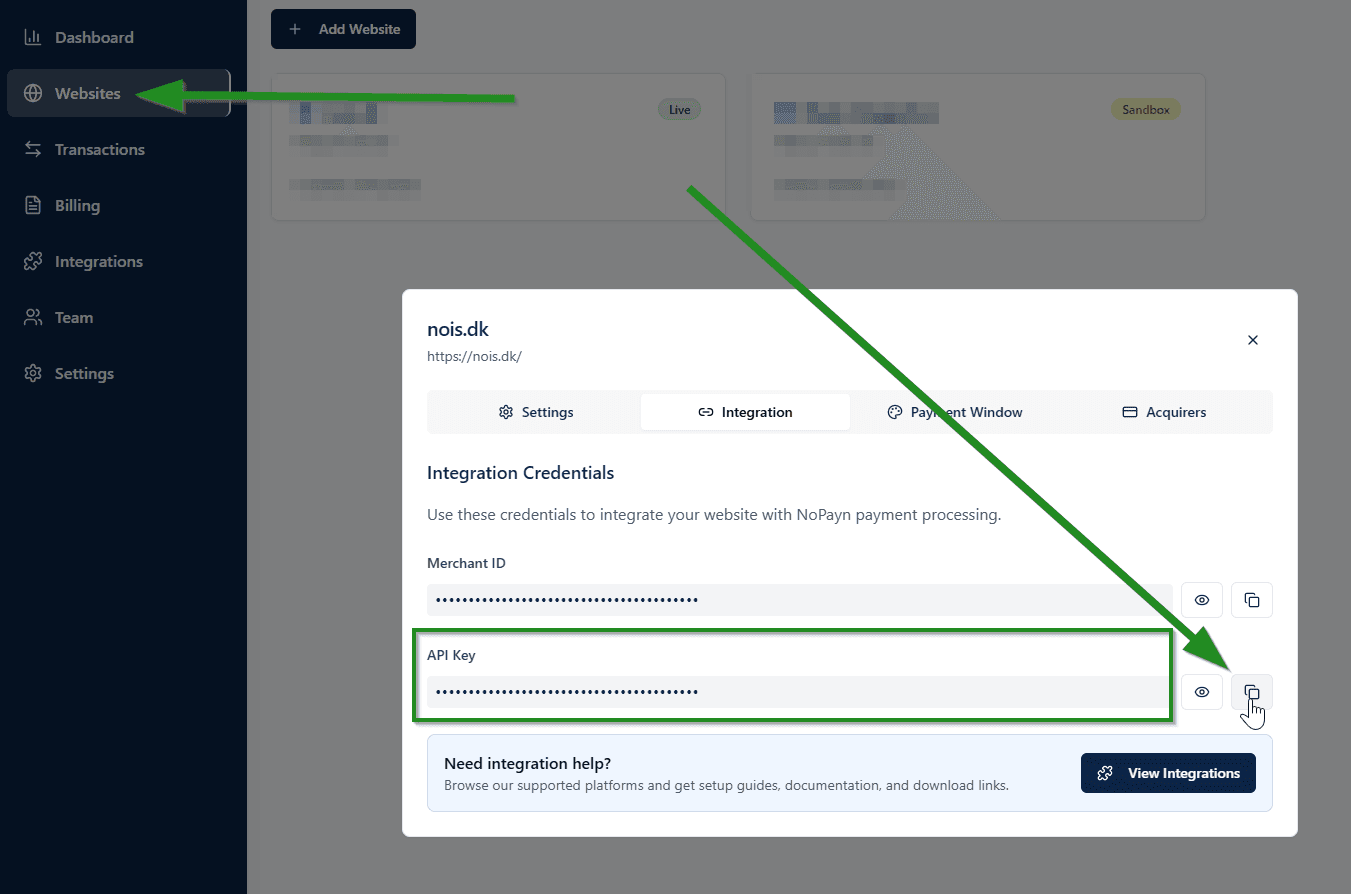
Log into the Merchant Portal and navigate to Websites, then click on the website you want to connect. Click on Integration where you will find your API key.
In the NoPayn module configuration, enter your API Key and configure the following settings:
| Setting | Description |
|---|---|
| API Key | Your NoPayn API key |
| Credit / Debit Card | Enable/disable credit card payments |
| Apple Pay | Enable/disable Apple Pay |
| Google Pay | Enable/disable Google Pay |
| Vipps MobilePay | Enable/disable Vipps MobilePay |
| Manual Capture | Authorize credit card payments only — capture when you ship |
| Debug Logging | Enable detailed logging to var/logs/nopayn_debug.log |
Paste the key into the API Key field in the Cost+ Library configuration page and click Save.

Paste the key into the API Key field in the Cost+ Library configuration page and click Save.

After installation, click Configure on the Cost+ Payment Gateway module and set the following:
| Setting | Description |
|---|---|
| API Key | Your Cost+ API key from the merchant portal |
| Credit / Debit Card | Enable/disable credit card payments |
| Apple Pay | Enable/disable Apple Pay |
| Google Pay | Enable/disable Google Pay |
| Vipps MobilePay | Enable/disable Vipps MobilePay |
| Manual Capture | Authorize credit card payments only — capture when you ship |
| Checkout Expiry | Pending-order timeout in minutes (default 5) |
| Debug Logging | Enable detailed logging to log/costplus_debug.log |
After saving, open Payment > Restrictions and enable the Cost+ Payment Gateway module for each currency you accept.
For PrestaShop 8.x, 1.7, and 1.6 hosting environments, enable the cURL CA bundle option during configuration to avoid SSL certificate issues.
3. Enable Payment Methods
Payment methods are configured directly in the module settings (see step 2 above). Toggle each method on or off as needed.
Only activate the payment methods you have been approved for and received confirmation for.
After saving your API key, upload each payment method module separately via Upload a module.
Return to Improve > Module Manager, click Upload a module again, and upload each ZIP file for the payment methods you want to enable (e.g. Credit Card, MobilePay, Swish).
Only activate the payment methods you have been approved for and received confirmation for.
Payment modules will either have a Configure option (if additional setup is needed) or just an Enable/Disable toggle.
Payment methods are toggled directly in the module configuration page (see step 2 above). Enable each method you want available at checkout.
Only activate the payment methods you have been approved for and received confirmation for.
Payment Flow
- Customer selects a Cost+ payment method at checkout
- Customer is redirected to the Cost+ Hosted Payment Page (HPP)
- After completing payment, customer is redirected back to the store
- A webhook confirms the payment status server-to-server
Webhook
The webhook URL is automatically configured per order:
https://your-shop.com/module/nopaynpayment/webhookNo manual webhook configuration is required — the module handles registration automatically.
Manual Capture
When enabled for credit card payments:
- Payment is authorized but not captured at checkout
- Capture occurs when the order is shipped / marked as completed
- If the order is cancelled, the authorization is automatically voided
Auto-Refund
If a captured payment order is cancelled, the module automatically issues a full refund. Partial refunds can be processed via PrestaShop credit slips.
Checkout Button Labels
For the best user experience with offsite redirect flows, consider updating the checkout button label to "Review order" instead of "Confirm and pay", since the actual payment happens on the Cost+ hosted page. This is a global PrestaShop setting, not module-specific.
Webhook
The webhook is automatically configured by the module. No manual setup is required.
Webhook
The webhook is automatically configured by the module. No manual setup is required.
Webhook
The module configuration page shows a webhook URL. Copy it into your Cost+ dashboard if your Cost+ account requires a static webhook registration.
The webhook endpoint receives Cost+ events, then calls Cost+ again with GET /orders/{id} before updating the PrestaShop order — this keeps return-URL and webhook handling idempotent.
Expiry Cron
The module configuration page shows an expiry-cron URL. Schedule it to run every minute:
* * * * * curl -fsS "https://your-shop.example/index.php?fc=module&module=costpluspayment&controller=cron&token=..." >/dev/nullUse the exact URL shown in your PrestaShop back office — the token is generated during installation and is different for every shop. The cron endpoint cancels stale pending Cost+ orders after the configured Checkout Expiry.
Manual Capture & Refunds
- With Manual Capture enabled, payments are authorized at checkout and captured when the order is shipped / marked as completed
- If a captured order is cancelled, the module issues a full refund automatically
- Partial refunds are processed through PrestaShop credit slips
4. Final Steps and Testing
- Double-check all enabled payment methods
- Place a few test transactions -- both successful and failed -- to ensure everything flows smoothly
- Configure advanced behavior such as manual vs. auto-capture depending on your fulfillment process
Support
Need help? Reach out to our support team at support@costplus.io.