 Docs
DocsOpenCart
Integrate Cost+ with your OpenCart store (4.x and 3.x / ocStore 3)

Integrate Cost+ as a payment method in your OpenCart store. The official NoPayn Payment Gateway extension is available for OpenCart 4 and OpenCart 3 / ocStore 3.
Prerequisites
- Active Cost+ merchant account
- OpenCart 4.0.0.0 or later
- PHP 8.0 or later
- Admin access to your OpenCart dashboard
- Active Cost+ merchant account
- ocStore 3.0.x or OpenCart 3.0.3.x
- PHP 7.4 or later
- Admin access to your OpenCart dashboard
Supported Payment Methods
- Credit / Debit Card — Visa, Mastercard, Amex, Maestro, V Pay, Bancontact, Diners, Discover
- Apple Pay
- Google Pay
- Vipps / MobilePay
- Credit / Debit Card — Visa, Mastercard, Amex, Maestro, V Pay, Bancontact, Diners, Discover
- Apple Pay
- Google Pay
- Vipps / MobilePay
- Swish
1. Install the Extension
Method A: Upload via Admin Panel (Recommended)
- Download the latest
.ocmod.ziprelease from GitHub - In your OpenCart admin, go to Extensions → Installer
- Upload the
.ocmod.zipfile - Go to Extensions → Extensions → Payment
- Find NoPayn Payment Gateway and click Install, then Edit
Method B: Manual Upload
- Download or clone the repository
- Copy the contents of the
upload/folder into your OpenCart root directory - Go to Extensions → Extensions → Payment
- Find NoPayn Payment Gateway and click Install, then Edit
Architecture
OpenCart 3 uses a multi-extension setup:
- NoPayn - Global Settings — shared configuration (API key, order statuses, method availability, manual capture, debug logging)
- NoPayn - Card Payments — credit/debit card checkout
- NoPayn - Apple Pay / Google Pay — wallet checkout (if only one wallet is enabled, the label adjusts automatically)
- NoPayn - Vipps MobilePay — Vipps/MobilePay checkout
- NoPayn - Swish — Swish checkout
Method A: Upload via Admin Panel (Recommended)
- Download the
.ocmod.zipasset from the latest GitHub release
Use the .ocmod.zip asset from the release — not GitHub's auto-generated "Source code" downloads, which contain the repository layout, not the installer layout.
- In admin, go to Extensions → Installer
- Upload the
.ocmod.zipfile - Go to Extensions → Extensions → Payments
- Install NoPayn - Global Settings first
- Open NoPayn - Global Settings and configure:
- API key
- Completed, pending, and cancelled order statuses
- Available payment methods your merchant account is approved for
- Optional: card manual capture
- Optional: debug logging
- Install the checkout modules you want to expose:
- NoPayn - Card Payments
- NoPayn - Apple Pay / Google Pay
- NoPayn - Vipps MobilePay
- NoPayn - Swish
- For each checkout module, set: Status, Geo Zone, and Sort Order
Method B: Manual Upload
- Download or clone the repository
- Copy the contents of the
upload/folder into your store root - Go to Extensions → Extensions → Payments
- Follow the same install order as Method A (Global Settings first, then checkout modules)
2. Enter API Credentials
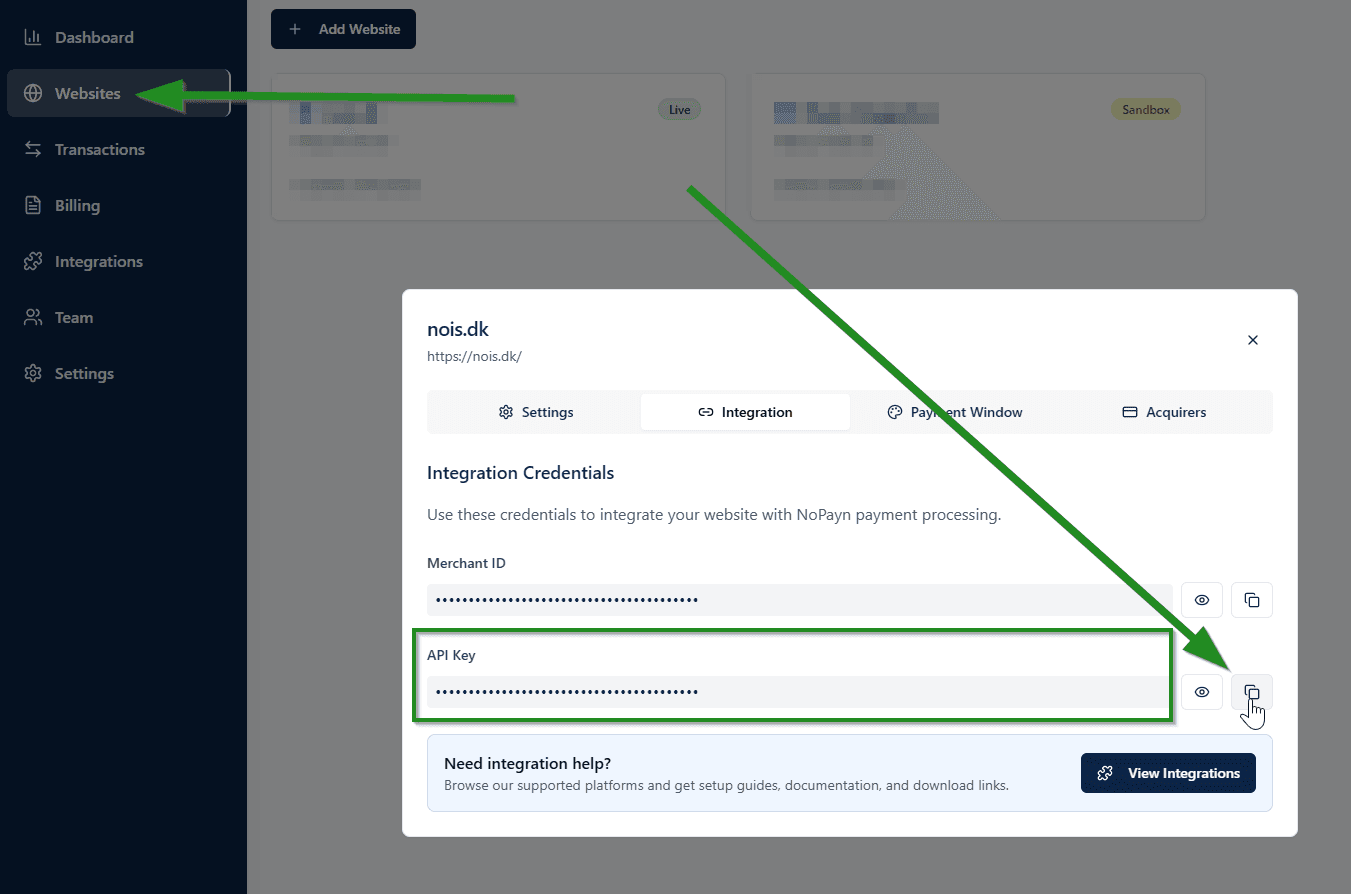
Log into the Merchant Portal and navigate to Websites, then click on the website you want to connect. Click on Integration where you will find your API key.
In the NoPayn Payment Gateway settings, enter your API Key in the corresponding field.
In NoPayn - Global Settings, enter your API Key in the corresponding field. The API key is shared across all checkout modules — you only need to enter it once.
3. Configure Payment Settings
- Enable the payment methods you have been approved for
- Set your preferred order statuses for completed, pending, and cancelled payments
- Optionally restrict payments by Geo Zone
- Set Status to Enabled
- Click Save
Global Settings
NoPayn - Global Settings stores all shared configuration:
| Setting | Description |
|---|---|
| API Key | Your NoPayn API key |
| Order Statuses | Completed, pending, and cancelled status mapping |
| Method Availability | Which payment methods your merchant account is approved for |
| Manual Capture | Authorize credit card payments only — capture later |
| Debug Logging | Enable detailed logging for troubleshooting |
Checkout Module Settings
Each checkout module has its own storefront settings:
| Setting | Description |
|---|---|
| Status | Enable or disable this payment method at checkout |
| Geo Zone | Restrict to specific geographic zones |
| Sort Order | Display order on the checkout page |
Only activate the payment methods you have been approved for and received confirmation for.
Payment Flow
- Customer selects a Cost+ payment method at checkout
- Customer is redirected to the NoPayn Hosted Payment Page
- After payment, the customer returns and the order status is updated automatically
- NoPayn sends a webhook for asynchronous status confirmation
The extension uses the Cost+ Hosted Payment Page, meaning customers are redirected to a secure payment form. No sensitive card data is handled by your server.
Each checkout module is a separate OpenCart payment extension, giving customers distinct radio options at checkout (e.g. "Card Payments", "Apple Pay & Google Pay").
- Customer selects a payment method label at checkout (e.g. Card Payments)
- The extension creates a NoPayn hosted payment order
- Customer is redirected to the secure NoPayn payment page
- After payment, the customer returns and the order status is updated automatically
- NoPayn sends a webhook for asynchronous status confirmation
The Apple Pay / Google Pay module sends both methods in one transaction so the NoPayn hosted page can offer both wallet options in a single flow.
Upgrading from v1.0.0 to v2.0.0
Version 1.0.0 used a single checkout method called "NoPayn Checkout". Version 2.0.0 changes to separate checkout modules per payment method. When upgrading:
- Upload the new package
- Your existing "NoPayn Checkout" entry becomes NoPayn - Global Settings
- Review and save the global settings
- Install and enable the new checkout modules you want customers to see
4. Test and Launch
Place a few test transactions to ensure everything works smoothly. We recommend testing both successful and failed payments to confirm all scenarios are handled correctly.
Support
Need help? Reach out to our support team at support@costplus.io.